


 |
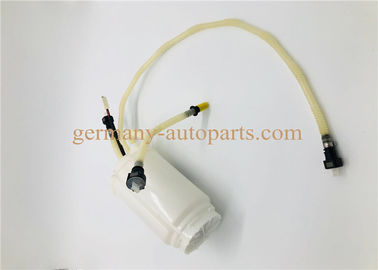
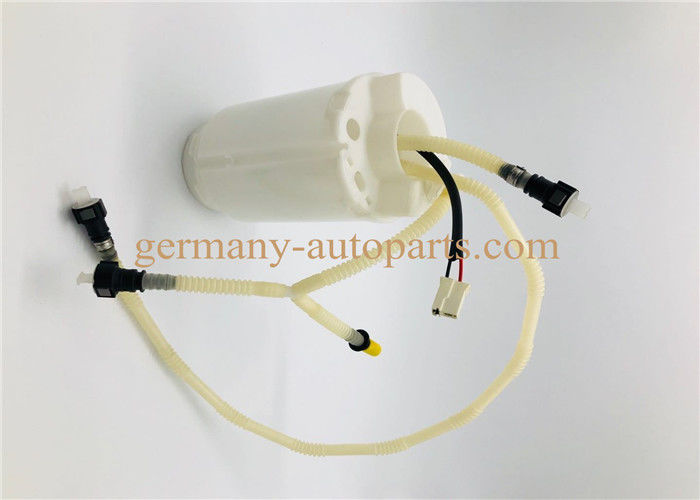
Left Side 7L6 919 087 F Fuel System Parts , VW Touareg 3.2 V6 Fuel Pump Assembly
Product Details:
| Place of Origin: | China |
| Brand Name: | MANER |
| Certification: | ISO9001/TS16949 |
| Model Number: | 7L6 919 087F |
Payment & Shipping Terms:
| Minimum Order Quantity: | 10pcs/consultation |
|---|---|
| Price: | Negotiation |
| Packaging Details: | Export Standard Packing |
| Delivery Time: | 5-15 work days |
| Payment Terms: | L/C T/T Paypal Western union |
| Supply Ability: | 10000 piece/ per month |
|
Detail Information |
|||
| Material: | Plastic | Application: | Volkswagen Touareg |
|---|---|---|---|
| Manufacture Part Number: | 7L6 919 087 F / 7L6919087F, 228 236 005 017 Z / 228236005017Z | Warranty: | 1 Year |
| Voltage: | 12V | Height: | 215MM |
| Pressure: | 4 Bar | Fitting Position: | Front Left |
| Highlight: | fuel system parts,fuel pump replacement parts |
||
Product Description
Fuel Pump Assembly Fit VW Touareg Fuel Supply System 3.2 V6 Left Side 7L6 919 087 F
Product Details:
| Selling Units: | Single item |
| Single package size: | 30X18X18 CM |
| Single gross weight: | 2.5 KG |
| Single net weight: | 1.05KG |
| Product Name: | Export Quality Customize Gasoline Pump Assembly 7L6 919 087F |
| Item No: | MANERPO0044 |
| Reference No: | 7l6 919 87F |
| Application: | VW Volkswagen Touareg |
| Size: | standard |
| Packaging Details: | Export standard packing |
Link Vehicle :
For Volkswagen Touareg (7LA. 7L6 .7L7) 4.2 V8
1. Construction Type : Closed off -Road Vehicle
2. Construction Year : 12.2002-11.2006
3. Power : 310hp
4. Cylinder Capacity: 4172 ccm
For Volkswagen Touareg (7P5,7P6) 3.6 V6 FSI
1. Construction Type : Closed off -Road Vehicle
2. Construction Year : 04.2010-03.2018
3. Power : 280hp
4. Cylinder Capacity: 3597 ccm
For Volkswagen Touareg (7P5,7P6) 4.2 V8FSI
1. Construction Type : Closed off -Road Vehicle
2. Construction Year : 01.2011-03.2018
3. Power : 360hp
4. Cylinder Capacity: 4163 ccm
About Parcel Shipping detail:
1. We are committed to the success of payment, delivery within 48 hours to complete, preferred DHL, FedEx, EMS,Aramex,Transfer 4PX, Shipping Time: 3-15 days, the slowest will not exceed 20 days.
2. Need to pay duties, please timely clearance of the recipient, after payment, you can leave us a message.
3. Belongs to remote areas, if you do not pay the extra freight, Europe, we preferred DHL Global Mail, other regions,We choose Economy shipping,ePacket,Singapore post, China Post Registered Air Mail,Shipping Time:15-25days.
FUEL PUMP REPLACEMENT INSTRUCITONS
I. Preparations
A.Fuel systems are under pressure.It is necessary to relieve the fuel system pressure before beginning work on the fuel system. Relieving the pressure can be done by removing the fuel cap.
1. Locate and remove the fuel pump fuse from the fuse block.
2. After the fuse is removed, start the engine and left the engine consume the remaining gasoline in the fuel lines.The engine will stop when stop when remaining fuel is consumed.
3. Once the engine has stopped, crank the engine for three seconds to relieve any possible remaining fuel pressure.
B. Disconnect the vehicles negative/ground cable at the battery and secure it so that it will not accidentally make a connection while replacing the fuel pump.
C. Drain the gasoline from the vehicle's fuel tank.
1. Using only and OSHA approved gasoline transfer pump and approved fuel storage containers, remove as much gasoline as from the fuel tank through the filler neck.
2. Raise the vehicle with an automotive hoist or jack up the vehicle and support it with OSHA approved jack stands, which allow unobstructed clearance for the removal of the fuel tank.
3. Fuel tank gasoline levels will vary depending on the amount of gasoline removed through the filler neck. Once the vehicle is raised, additional gasoline can be removed through bracket connections.
II. Fuel Tank Removal
Fuel tanks vary from vehicle to vehicle; the following fuel tank removal instructions are for a typical fuel tank removal. For more specific instructions on fuel tank removal for your specific vehicle it may be necessary to obtain an approved service manual for the vehicle that you are replacing the fuel pump on.
1. Visually inspect the scope of work involved before beginning the fuel tank removal step.Be sure to have help readily available.
2. Disconnect all visible fuel hoses that connect to the fuel tank from the rest of the vehicle (be sure to mark or label all connections for reassembly).
3. Disconnect electrical connections at the fuel tank taking extra care not to damage pins or connectors.
4. If necessary, disconnect and remove the fuel filler neck from the vehicle.
5. Loosen the retaining straps of the fuel tank and support the fuel tank prior to removing the straps entirely. Take extra precautions to avoid a fuel spill.
6. Take note of the condition and location of any insulating pads.Worn or misaligned, wrongly installed pads should be replaced as they may affect the performance of the new fuel pump.
III: Bracket Removal
1. Before removing the bracket from the fuel tank,be sure to thoroughly clean any dirt or debris that may have accumulated at the top of the fuel tank or at the opening of the locking ring area.This step must be done to prevent debris or foreign matter from entering the fuel tank which can cause problems later on.
2. Using the correct tppls,remove the locking ring or retainer using care not to damage it.
3. Carefully lift out the bracket from the fuel tank. The old O-ring seal must be removed using extra care not to let pieces fall into the tank as it may be brittle. Discard the old O-ring seal,it will be replaced with a new O-ring seal which is included in the kit.
IV. Replacement of the pump
1. Replace the pump and filter as directed in the instructions that accompany the kit.
2. Ensure that all connections are secure before installation into the fuel tank.
V. Bracket Reinstallation
1. Before bracket reinstallation, carefully inspect the inside of the fuel tank for contamination,dirt or foreign matter.Clean out the fuel tank if necessary prior to bracket reinstallation.
2. Ensure the bracket is fully assembled and ready for installation.
3. Install the new O-ring in the groove at the brscket opening. Carefully lower the bracket assembly into the fuel tank taking extra care not to bend or damage the float or the float arm.Be sure not to disturb the O-ring when seating the bracket while keeping the filter free of kinks and fold as this may restrict fuel flow.
4. Reinstall the locking ring or retainer using the correct tools.
VI. Reinstalling the fuel tank.
1. As mentioned in section II,worn insulation and mounting pads must be replaced.It is imperative that pads are installed in the same nanor that they were removed as missing or wrongly installed pads will cause noise or vibration to the vehicle.
2. Prior to lifting the fuel tank into place,ensure that all fuel lines and hoses sound.Replace any inferior or defective fuel lines or hoses.
3. Support the fuel tank in the correct installation position.Once the fuel tank is in the correct position install the support straps and bolt in the same manner that they were removed.
4. Reconnect all fuel lines and electrical connections securely ensuring the there are no kinks or perforations.Routing of fuel lines is especially important,be sure to route fuel lines in the same manner as before using all clips and securing devices provided by the manufacturer.
VII. Finishing the Process
1. Gasoline should only be reinstalled back into the vehicles fuel tank with an OSHA approved gasoline-dispensing device.Before moving to the next step,be sure to clean up any fuel that may have spilled during pump replacement or during the gasoline refilling process.
2. At this time a visual inspection for leaks is necessary .Correct any leaks at this time prior to proceeding to the next step
3. Following the reverse order or the removal ,reinstall the fuel pump fuse back into the fuse block and reconnect the negative/ground battery cable to the battery .
4. Start the vehicle's engine and inspect for any leaks. If leaks exist correct them immediately.
5. Some vehicles are equipped with OBD (On board diagnostic)systems which may have illuminated a light indicating a trouble code of malfunction .Clear trouble codes using a service manual specific to the vehicle.
Caution:
1. Prohibit fuel pump free working in non-oil situation.
2. Fuel pump in line should use standard fuel:alcohol pump can use alcohol fuel, diesel fuel pump use diesel fuel,methanol fuel pump use methanol.3. You need replace the fuel pump and strainer / filter at the same time.
4. It is not allowed to use falled off products.
5. Replace fuel filter according to the stipulated time or mileage.
6. Replacement pump should be kept in clean work environment.
7. Oil should be added timely if it is too low, it is recommended to add oil when the tank only have 1/3 of fuel.
8. Fuel pump should match with vehicles models.
Show Picture :
Want to Know more details about this product